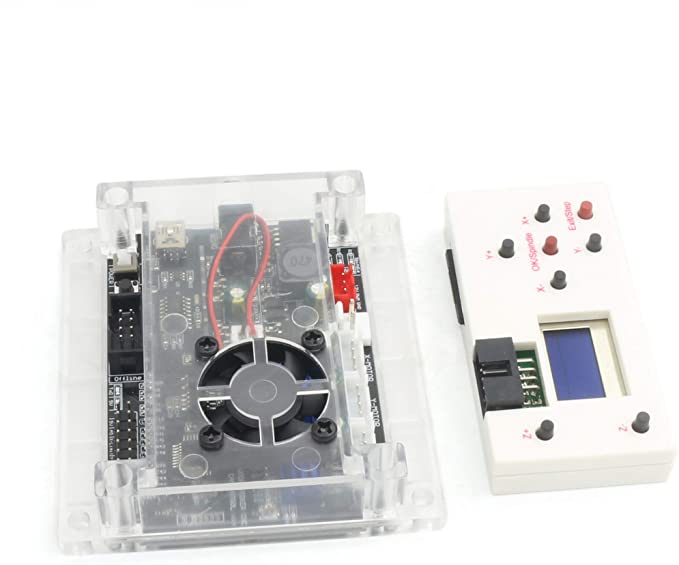

GRBL 1.1F 3 Axis Control Board V3.4+Offline Controller (GRBL 1.1F 3 Axis Control Board V3.4+Offline Controller.
Input voltage: 12-24VDC (24VDC is recommended); output voltage: 12-24VD.
GRB Control/Candle (3 axis); Laser GRB; Support System:Windows XP/7/8/10; Support Laser 12V 5Amax; Support GRBL Contol/Candle (3 axis).
Support stepper motor: 12V, maximum current of 2A or less is recommended within 1.5A of the stepper motor’s maximum current and additional heat. (Any stepper motor 42 or 57 is acceptable. Support spindle voltage and current: 24V 2A Support Spindle PWM speed (0 percent -100 percent .
Input/output devices: atmel 328P (arduino nano); Offline Control: supports SD and TF cards at the same time, with a standard capacity of 1 GB (notebooks generally have SD card interface, copy files are very convenient.
Included in the package are.
1 x GRBL control board V3.4 with 3 axe.
1x GRBL offline controller (not included).
1 x USB data cabl.
Specification.
USB port is used for connection (USB-CH340.
Supporting software includes the GRBL controller and the UniversalGcodeSender.
Voltage range: 12-24 volt.
Atmel 328P is used as the master chip (arduino nano.
MOSFET is used as the spindle drive chip.
PWM speed of the spindle: Suppor.
12V stepper motor with a maximum current of 2A is used as a support motor. (Any stepper motor 42 or 57 will do..
Support for laser engraving.
Power Interface: 5.5-2.5mm DC interface with a 5.5-2.5mm DC interfac.
Advantag.
1st, attach the outer casin.
Secondly, include the power button switch.
3.Make use of an integrated stepper motor drive from an imported source.
4.Incorporate a fan port to assist in heat dissipation.
5.incorporate offline recognitio.
6.Improved USB interface performanc.
The following is the function of the GRBL offline controller.
1. Manual control: manually adjust the X, Y, and Z axis locations to determine the engraving starting point, manually open and close the spindle, manually open and close the cooling fa.
2. File engraving: after the off-line controller saves the file, it can connect to the GRBL control board and begin engraving; there is no need to connect a PC computer to this process.
3. Save the file: After connecting the off-line controller to a PC, it will be recognized as a USB storage device with a large capacity, allowing you to access the engraving file directly.
If SD indicates that the card is in good condition, turn on the power supply immediately after inserting the card; otherwise, it will not work. It is possible to recognize SD cards with a capacity of 4GB.
To switch between the two modes, press the X- or X+ button.
Control:Click on the confirmation button to be taken to the manual controlling page.
File: To access the file page, press the confirmation button.
Set: To access the setting page, press the confirmation button.
The actions controlled by the buttons on the off-line controller are as follows.
SPN is responsible for spindle control; therefore, SPIN should be pressed.
If the fan is controlling the fan, you should press SMOD.
Exceeds all expectations by a long shot.