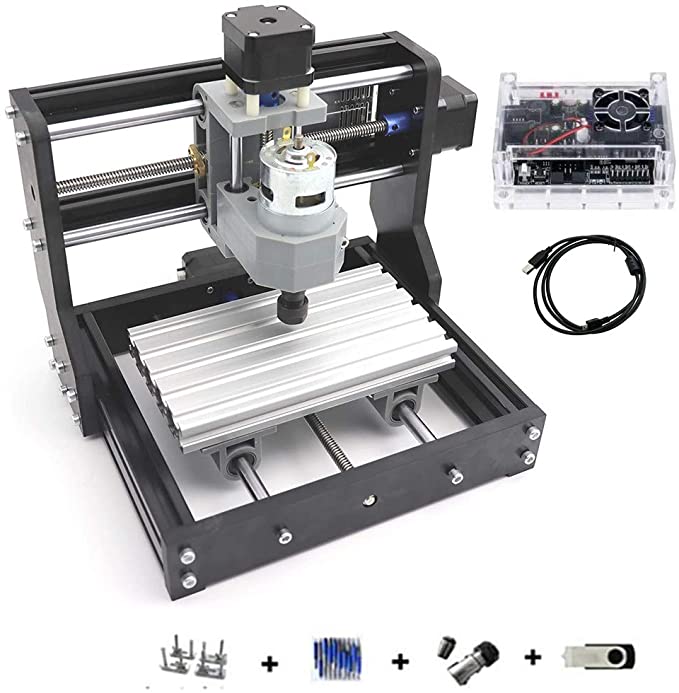

Upgrade Version 1610 ProMini CNC machine small in size and weight, with a USB interface and GRBL control systems, making it a great cnc router machine for beginning woodworkers. The CNC1610 PRO machine is very simple to set up, has a stable structure, and comes with an English user manual included in the package.
•Working area: 18 by 10 by 4 centimeters; frame size: 30 by 26 centimeters; type: USB port desktop cnc route.
System requirements: Windows XP, Windows 7, Windows 8, and Windows 10. G-code (.nc/.txt/.tape/.gcode) and other supporting file.
Spindle and stepper motor Dimensions: 45mm 10000 rpm maximum power 120W; ER11-3.175mm (can be replaced 0-7mm); Nema17 42 stepper motor 1.3A/0.3N.m; ER11-3.175mm (can be replaced 0-7mm).
The main application is that it can be used to engrave plastic, wood, acrylic, pvc, pcb, and other similar materials.
Soft metals such as copper and aluminum, as well as other materials, can be carved, but hard metals such as jade and other items with a very hard texture cannot be carved.
GRB Software; GRB Control (candle); GRB Softwar. 1 pcs 4 GB USB flash drive with user manual and GRBL software is included in the package as well.
For quite some time, I’ve been intrigued by these small CNC routers/mills. A few higher-end desktop machine tools are available to me (a Sherline DRO mill, a Taig manual lathe, a Grizzly micro lathe, and a generic wood and pen lathe). I believe I have reached the point where I would like to add a cnc mill or cnc to my Shoreline. However, I have taken a break from CNC work for a while. So this purchase was intended to serve as a form of re-education for me. And, if it works, it may have some applications. However, this is a very small and very light-duty unit in comparison. Also, as is the case with so much import-based merchandise, you may receive pure junk or you may receive something of some value. Following is a description of what I have encountered.
The vendor shipped on time and without any problems.
The packaging was in good condition, and the parts were free of damage or scratches.
Box was opened at 7 p.m.
I spent 30 minutes inspecting parts, counting hardware, and looking at the pictures (with no words) in the assembly section of the manual before starting the project.
It took about 45 minutes to put together the first two pages, which were the base and Y axis. It took me a long time to get everything squared up to the same point, so I used a small square and concentrated hard. I have a feeling that anything legally binding will/would be a problem.
The Allen wrenches that were provided were adequate. I had my small tool kit ready, but because of the cheapness of the hardware (plated rather than stainless steel), I didn’t think anything other than the supplied tools would be sufficient to complete the hex. At some point, I intend to replace the current hardware with stainless steel. The only part that required attention were the retainers for the tee slots. Not well made, and several of the threads were not properly threaded. I ran a tap into all of them, and it was effective. I had a couple extras in the kit, but I decided to experiment with a couple of 3-D printed inserts just to see what would happen (on the uprights that hold z axis.
The next couple of pages, as well as the X and Z axis, as well as the spindle installation, took approximately 30 minutes. There are no problems. It’s important to note that the accuracy of the parts and machined holes is quite good. In order to ensure square, very little effort or time is required. The installation of the spindle was one instance in which caution was advised. It is clamped in place and held in place with a bolt that secures the clamp in place. Although it took some effort to pry it open enough to get the spindle in place, I was mostly concerned about damaging the mounting bracket (plastic..probably ABS). It was no problem once I spread the open side to approximately a 3/8″ gap. Avoid being too rough, but it flexed fine and showed no signs of stress lines when tested.
The final step was wiring. Please keep in mind that it will take some effort to keep the wire harnesses looking tidy. I’m going to figure out a way to help them. Although zip ties are included, a more permanent solution is required. It took only 8 minutes to complete the wiring.
I plugged it in and turned on the off-line controller, and all of the lights turned on as well. With the help of the off-line controller, all three directions were moved correctly. The spindle motor began to spool up and adjust the speed. In a minute or two, I’ll set up a dial indicator and check its accuracy. When I selected one of the preloaded programs (there was no bit..just the control), the machine immediately went to work.
So after a couple of hours of simple (and, to be honest, enjoyable) labor, the tiny machine came to life. There were no problems in any of the parts (other than the insert and hardware quality issue). There were no issues with the fit and finish. There were no problems with the electrical or control systems.
It appears to be a reasonable starting point for a very low-cost version of this. I have no illusions that it will be a “hoarding” piece of content. I’m also interested in how accurate it can be when routing. It should be entertaining, however, to figure it out and put some of the little projects I have in mind into action.
The next update will include information on accuracy and adjustment, which will be based on what I do later tonight or tomorrow. I’ll take some photos and post them.
I also have a z axis touch off to experiment with, which I will demonstrate as well.
Low-power laser heads are readily available, and if the accuracy is satisfactory, I may experiment with them as well. Moreover, if the accuracy is even remotely close to reasonable specifications, I have a couple of printed circuit boards that I have created in KI Cad..and I am very interested in seeing if I can incorporate that capability into my projects.
So far, it has been a lot of fun. If you are interested in this type of stuff, you can certainly spend a lot more money on it.