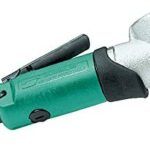

Tongue and groove stapler for hardwood flooring that is extremely versatile.
Flooring shoe as well as a conventional nose are included.
Every time, the staples are driven at a 45-degree angle.
Lightweight and simple to operat.
1-inch galvanized staples with a 1/4-inch crown are available from the manufacturer.
The tongue and groove stapler is a versatile tool for installing hardwood flooring. Every time, the 1/4″ crown staples are driven at a 45 degree angle with precision. Installation of 3/8″ and 1/2″ hardwood and laminate flooring is made easier with this tool. Includes a conventional nose that can be used for a variety of tasks such as face nailing, decorative trim, picture frame assembly, upholstering moldings, and other similar projects.
Overall, I’m pleased with the Porta-Nailer 461 I purchased. I just finished installing 550 square feet of bamboo flooring, which required the use of 3000 staples in total. Not a single staple jammed, even when I made the mistake of putting one staple right on top of another, as I had feared.
One of the most appealing features of the 461 is that it accepts a 1.25-inch staple, which is common in the industry. The majority of 18 gauge staplers are only capable of handling staples up to an inch in length. When installing 1/2 inch flooring, the extra length is critical. However, while the printed material that came with the stapler only mentioned using one-inch staples, the sticker on the stapler itself stated that it accepts staples up to and including 1 1/4-inch in diameter.
Some other aspects of the instructions were inadequate as well. . Even though they go into great detail about the safety features and how to use the stapler safely, they don’t go into great detail about how to install the flooring foot. The good news is that it only took me a minute to figure it out and put it all together. There appeared to be a different, possibly older, model described in the instructions for loading the staples on the stapler. Despite the fact that the system is a little different from the average stapler, it was relatively simple to figure out how to load the staples into it.
It takes a bit of concentration to ensure that the flooring foot is properly secured to the tongue of the board because of its small size. It is possible that this will slow down your work at first until you get a good feel for the process. (I’m not sure any other 18 gauge stapler has a better foot than this one, either..
In addition, the stapler had a tendency to bend the top of the staple over. No one was ever able to figure out why this was happening. Maybe it was because I didn’t have the stapler perfectly seated on the tongue when I sewed it together (see the note above about the small flooring foot. It’s also possible that the poor quality of the staples was to blame. It’s also possible that the hardness of the boards and the grain patterns in the boards had something to do with it. Because I was nailing 1/2-inch solid hardwood, I believe any stapler would have difficulty with an 18-gauge staple, but I could be wrong. That is a very light gauge to pass through a hard wood like oak or walnut.
Fortunately, it wasn’t a major problem. For those staples, all I needed was a nail set to tap the staple top down into the tongue of the board so that the next board would fit snugly. But I can imagine that a flooring contractor might have been a little irritated at the prospect of having to take the time to do so.
My review may come across as a little negative, but I was actually quite pleased with the machine. The stapler itself appears to be sturdy and well-constructed. And it completed the task without causing any damage to the wood. I am confident in recommending the tool.