
• New Version Control Board- The new control board includes an integrated driver chip, a fixed heat sink, an external fan, and a durable shell, all of which contribute to the control board’s overall service life being significantly extended. Ascertain that it has a long working time and can be used continuously.
Upgrade to 1G Storage Capacity with the “New Version Offline Controller”. 1There is no requirement to connect the computer. 2An SD card reader is included for writing G-code files or NC files into the root directory of the computer. 3) Adjust the X, Y, and Z axis locations as the engraving starting point, and manually open or close the spindle and the light head as needed.
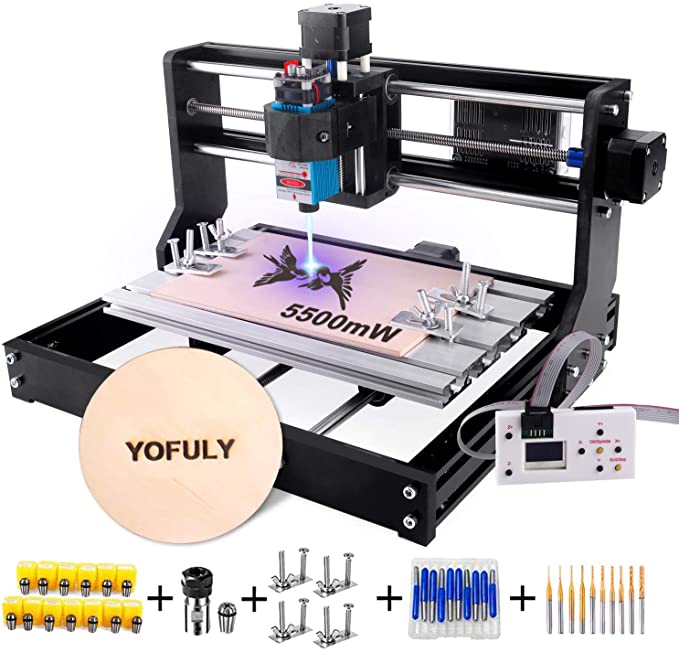
The following are the primary working parameters: Effective working area: 300x180x45mm(11.8 x 7.1 x 1.8″); Software: Grbl control(Candle); Spindle: 775 motor, 24V; Supported Systems: WindowsXP, Windows7, Windows8, and Windows10.
Wide Range of Uses- Suitable for carving wood, bamboo, paper, leather, plastic, acrylic, PCB, CCL, metal surface paint, metal surface plating, and other materials, among other things. Metal, iron, glass, 201/304 stainless steel, jewelry, and silver are all prohibited from being worked on.
BEST SERVICE- We are dedicated to providing the highest quality products and services possible. If you have any questions, please do not hesitate to contact us, and we will provide you with a satisfactory answer.
For the past week or so, I’ve been using this router, and I’m generally pleased with it so far.
Although the assembly was straightforward, I did have to make a few minor adjustments afterward. It appeared to be put together correctly at first, but once I started using it and started paying attention to the details, I realized there were mistakes. When I realized that my y-axis range was less than the advertised 180mm, I realized that I’d made a mistake when I installed the plastic bearings on the bottom plate. When assembling this, make certain that the components are installed in such a way that they provide the greatest range of motion. If you install one or more of them backwards, your range in that direction will be reduced by approximately 15mm. Fortunately, I only had to remove one linear rail to correct the problem, so I didn’t have to disassemble the entire system.
Also, the instructions state that the side braces should be installed at 44.5mm or something along those lines, which I followed but which turned out to be a little too far forward. When the spindle bit is moved to the specified distance, it overshoots the forward edge of the bottom plate and comes to a stop before reaching the rear edge. Even though it should be installed a little closer to the rear than what is specified in the instruction manual, this has not been done yet because I haven’t needed the entire range yet.
This is the first time I’ve used a laser engraver, and I’ve discovered that it takes a little practice to get the hang of it. You’ll need to experiment with different materials to find the right balance of laser power and movement speed. Because the laser is significantly more powerful than I anticipated, my initial results were a shambles of scorched messes. I was able to successfully engrave a challenging picture of a black pug’s face on a square of wood using much lower power and slower movement, but it took four pieces of wood before I was able to get it right the first time. This laser is a colossal monster.
I’ve tried my hand at some simple wood carving, and the results were satisfactory. I’m confident that I’ll be able to improve my performance.
The primary reason I purchased this was so that I could create my own circuit boards rather than having to order them and wait for them to arrive. After a lot of trial and error, I was finally able to mill a successful board last night after a long period of learning the ropes. The fact is that you will not be able to simply attach a piece of copper clad board to the router and begin milling; you will be required to conduct some research in order to be successful with this router. Aside from that, the v bits that come with this are too fragile to be used with copper clad board, so you’ll need to purchase the appropriate bits or you’ll end up breaking the ones that come with it. As far as I’m concerned, this is not a problem because even a professional PCB milling machine goes through a lot of bits until everything is just right.
I’ve put in a few hours on the laser printer now because it’s entertaining to play with, and I’ve noticed that it stops working after a period of inactivity with the printer. If the printer is turned on but not in use for an extended period of time, the laser will not turn on until the machine is turned off and on again. I’ve had it running continuously for hours at a time while working, but for some reason, it doesn’t like to be left idle for long periods of time. If your computer has been sitting idle for several hours, it may need to be rebooted due to some protection features.
It is necessary to lubricate all of the linear rails and lead screws. The machine may make some grinding noises as it moves around if it is not put through this process after assembly. This will be taken care of by a good rail grease, which will allow it to run smoothly.
This machine has exceeded my expectations thus far, especially considering its low price. When it comes to using it and getting good results, there is a learning curve to overcome, but there is a wealth of information about these machines available online.