
1 HP motor, 110V and 220V compatible, single-phase, ready to go (11A at 110V, 5.5A at 220V.
Cutting height: 6.
At the throat, the machine can cut 13-1/2.
All of the parts are made of ball bearings, and the blade guides are made of ball bearings, too.
Includes a 3/8″ blade, an aluminum fence, and a miter gauge.
Amazon says this is sold by Grizzly, but I say here that I bought mine from Grizzly, not from Amazon, and not from Amazon.
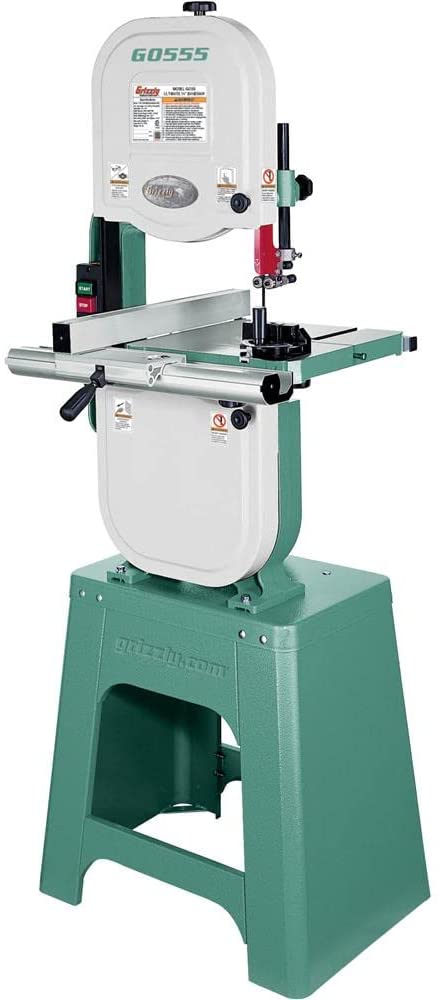
A 14-inch bandsaw from the Grizzly brand is called the “Ultimate” model. This review is for the model G0555 14-inch bandsaw. Grizzly has a few more models that are very similar, and it can be hard to tell the difference between them. Even though the G0555 looks like the “normal” version, it’s actually somewhere in the middle of their 14″ bandsaws. It has the model number without a suffix, but it’s actually somewhere in the middle. One of the models looks almost the same except that it is white, and there is another model that is called a “anniversary” model because it is black. Besides this, there is a saw with cast iron wheels instead of the aluminum wheel that this saw has. “Extreme” version: This one has a gooseneck work light, a bigger motor and more space for the work surface. It’s important to know that there are a few small differences, but all of them have G0555 as part of their part number.
For almost 20 years, I had a 12″ Craftsman bandsaw that was OK but had a lot of annoying flaws. I bought a new one. Bandsaw size can be hard to understand. Some people say that the diameter of the two wheels that the blade runs on (e.g., a 14″ bandsaw) is the size of the saw in inches. This isn’t true. Other people say that the dimension (e.g. 14″) refers to how far the blade is from the left side saw frame. In most cases, the same length works for both measurements. Sawmakers try to make their saws so that the left side of the blade (the part that moves up) is close to the right side of the saw’s frame. ..but the distance from the blade to the frame is always a little less than the distance from the wheel to the frame. Hopefully, it’s only about 12″ less. My point is that though the Craftsman saw was said to be a 12″ saw, its blade to frame clearance was 13.5″. To make things even more clear, this Grizzly 14″ saw has a blade to frame clearance of 13.5″, which makes more sense.
Because the Craftsman had a lower table, I liked that it had a built-in lamp that lit the blade well. It also had a design that tilted the blade but kept the table level. There were a lot of things I didn’t like about my Craftsman saw. I didn’t like the plastic blade guides because they didn’t work well and were hard to find replacements for. I also didn’t like how hard it was to make any adjustments, how inaccessible the lower blade guide was and how hard it was to change the saw speed. It also didn’t have a fence and its aluminum frame was too flexible. It was this last flaw that caused the motor pulley to break, and since Sears no longer had the part, I decided this was an omen that I should buy a new saw that would be easier to use and not have as many problems.
A lot of online research and reading reviews led me to choose this model, which is called the Grizzly, as my new skis. I don’t think it’s made just for Grizzly. For example, Shop Fox seems to have the same saw that Grizzly sells. In the past, Delta made a 14-inch saw that was very similar to the Taiwan factory’s saw. This is good, because what I had in mind was the kind of old Delta I remember from high school shop class.
The saw costs about $555, which is a price that fits the model number. I also bought the “riser” kit, which makes the maximum cutting height 12 inches. It has a cutting height of 6 inches. Because I wanted to be able to move the saw around the floor a little when I was cutting bigger pieces of wood, I also bought the “mobile base” kit that Grizzly recommends for this saw. All of this cost about $700, plus shipping, and it was worth it. This saw doesn’t come by UPS or FedEx. If you want it, you’ll have to get a raised loading dock or a fork lift to get it out of the truck. I decided to have the saw delivered to the loading dock of a nearby company that was friendly to me. There, two men lifted the saw into the back of my van so I could drive it home, and I was able to get it home. The box is about 200 pounds, so two strong people or three people who aren’t so strong can handle it.
There are two parts of the saw that need to be put together: the blade and the table and fence. The blade is already in place, but the stand needs to be put together. It’s not impossible for one person, working alone, to get the saw up on the stand. Some people have laid the saw and stand on their sides on the floor, bolted them together, and then tipped the assembly up to vertical.
When you buy the riser kit, it’s simple to put together. First, you have to separate the top and bottom halves of the cast iron frame with a single large bolt, then insert the cast iron riser block, and then put in the long bolt that came with it. Notice that the bolt head and its nut are both big and not the same size. An adjustable wrench can’t be used in the casting because there isn’t enough room for it to move. I had to buy two new open-ended/box wrenches, 24mm and 25mm, at the hardware store to finish the job. It didn’t work out for me when I put the riser on. The 105″ blade that came with the kit didn’t fit over the wheels. I had to take apart the factory-set blade tensioner mechanism in order to loosen it enough so that I could put the blade on. The Grizzly’s recommended way to adjust the tensioner didn’t work with the riser in place. Tech support told me that the design of the saw’s tensioner doesn’t take the riser into account. Even though the tensioner can be adjusted to allow the 105″ blade to fit on to the wheels, the tension gauge is no longer accurate and should be ignored from now on. As long as you use the “blade flutter” method to change the tension, this is fine with me.
If you buy the riser kit, there are a few more things to keep in mind. The left side blade guard that comes with the saw appears to be made of black plastic. The longer left side blade guard that comes with the riser appears to be made of black aluminum. There is a guard above the top blade guide that is made of stamped sheet metal with a red painted finish. The longer guard that comes with the riser is made of the same material and finish, but it has two telescoping sections with a thumb screw adjustment because there’s not enough space in the upper wheel housing for the longer guard if you fully retract it.
There is a standard blade that comes with the riser kit, and there is also a longer blade that comes with the riser kit. I didn’t think the blades would last very long. When I bought the saw, I bought two custom 105″ blades from Lennox with different widths and TPI. I now use them with the saw. It costs less than $15 each to make a custom blade, and the blades are good.
This is how it works: The saw runs smoothly and quietly, and the single knob adjustment for blade tracking is easy to use and works well. Pleased with the top and bottom blade guides. They can be easily and quickly adjusted with either an Allen wrench or a pair of knobs. There are three ball bearing rollers on each blade guide assembly. This is how it works: The Allen wrench moves the guide bearings on each side closer or farther away from each other. The knobs move them fore and aft. With the Allen wrench, you can lock the fore and aft adjustments in place. Adjustment access to the lower blade guide is almost as easy as with the upper blade guide. The guide design is the same, so only the fact that you have to reach under the table to adjust the lower one makes the lower one a little more difficult to deal with. I don’t know of any bandsaw that is better than this one in terms of this thing.
Table: Cast iron with a smooth ground top surface and a well-made slot for the mitre. If you buy this saw, the mitre is made out of aluminum, and it has a solid bar (not a cheap folded sheet metal bar like some saws have) that goes into the table’s slot. It also has a nice heavy mitre angle adjustment knob that doubles as a handle for moving the work forward. The fence that comes with the game is made of extruded aluminum. There is a front fence rail that attaches to the front edge of the table. It can be moved sideways so that the fence scale can be checked (which is graduated in both inches and millimeters). The rear rail also screws into the back of the table. There are rails on the fence that you can attach and remove it from when you need it or want to move it. Make sure you know that the back end of the fence doesn’t lock into place on the rail. It just rests on the rail with a low-friction pad in between (the pad height adjusts to make the fence even above the table top). The fence has a handle that locks the fence to the front rail, or lets it go so it can be moved. The fence is very easy to move so that it lines up with the table. The fence has a “cursor,” which is a clear magnifying lens that is above the fence scale. This makes it easier to place the fence in the right place. Grizzly does not come with a fence that is good for “resawing,” but I think they sell an extra resawing fence. For those who don’t know, “resawing” is when you use a bandsaw to cut a piece of wood into two or more smaller pieces. The board is placed on its edge on the table, and the blade cuts through the wood from edge to edge. Bandsaws that aren’t very good at this can have trouble with this because they don’t have enough cutting height, power, or a tall fence. Using the riser kit, you can make your G0555 taller. The motor is said to be strong enough for resawing, but the “extreme” version of this saw comes with a resawing fence and the riser, and its motor is half as powerful. So, I would say that this bandsaw can be used for some resawing, but if you plan to do a lot of resawing, you should buy the “extreme” version of this saw, not this one.
I didn’t mention that the table’s tilt adjustment is well made, sturdy, accurate, and easy to change. During assembly, there are two large knobs under the table. When the knobs are loose, the table can be tilted and then locked in place by tightening both knobs back up. As long as you don’t get rid of the stop (an adjustable bolt) under the table, you can also tilt the saw up to 15 degrees left. A table with a tilt angle is shown by a pointer that can be moved.
The saw has a quick release blade tensioner. Swing a large red lever, and the upper wheel drops about half an inch, making it easy to remove and replace the blade. Swing the lever back to its original position to tighten the blade, and the lever locks the tension. The actual blade tension can be changed by turning a big knob. This knob isn’t used to remove the blade, like some other saws do. After you change the blade, you don’t lose the tension you want on the blade.
To remove the blade, the table has a slot. A table pin is also included to keep the edges of the table together on both sides of the slot, so the blade won’t fall out.
Saw: It has two speeds, but there’s no way to change them right away. You need to move a grooved belt from one pulley to another in order to change the speed. As far as I know, I haven’t changed the speed myself, but the belt and pulleys look like they can be seen through the spokes of the blade’s wheel.
With a large pair of green and red buttons, you start and stop the motor. The buttons are in a control box that is on the left frame next to the table. The motor is set up to run on 115VAC, but it can be changed to run on 220VAC if that’s what your shop has.
The top and bottom blade housings have covers made of die-stamped sheet metal that are attached to the saw frame with long “piano” hinges and held in place by snap fittings that can be opened with large knobs. This means that you don’t need any tools in order to access the wheels or the blade. This access is quick and easy. The lower frame has a 4″ dust port that you can use to connect your shop’s dust extraction system, if you have one. You could connect a shop-vac to this port with the right adapter (not included). To the left of the table, there is a lot of dust from saws. I don’t think a dust extractor would help with this.
I’ve had the saw long enough to use it on a lot of projects, and I’ve been very happy with the quality, how easy it is to make adjustments and how well it works.
No, I can’t say for sure, but I think the frame and sheet metal parts are finished with powder instead of being spray painted.
It was recommended by Grizzly. I bought the mobile base. How to build it around the saw is explained in the instructions. This way, you don’t need a second person to help you lift the saw on to the base. In order to move the saw’s stand, I had to lift the saw’s stand a little at a time and hit the mobile base with a rubber mallet to move the base’s support plates under the saw stand’s feet with the mallet a few times. This worked well for me, though. A hack saw was used to shorten two of the four steel rails that make up the base of the mobile base. This made the base dimensions match up with the size of the saw stand, so the base will work with the G0555.
Because the G0555 doesn’t come with a work light, I bought this LED gooseneck work light, “FLEX-T-3X1W,” for $45. I went to the hardware store and bought a 90-degree steel bracket. I drilled or tapped holes into the bracket and into the back of the saw’s cast iron frame to make a small platform for the lamp’s base to rest on.