
Variable speed from 700 to 3000 RP.
Powerful 800-Wat.
A GFCI was built into the house.
50, 100, 200, 400, 800, 1500, and 3000 grit.
In this example, the radius of the vacuum-brazed profile wheel is 3/8-Inc.
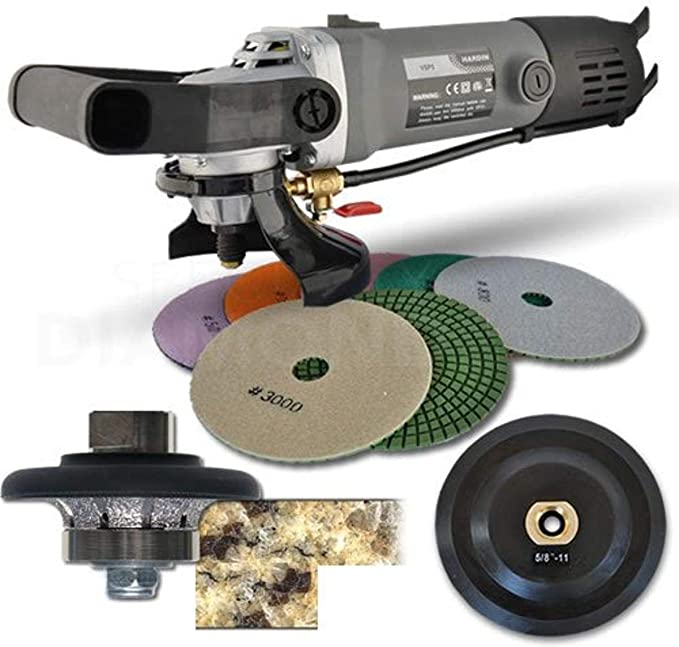
Using the Hardin VSP wet polisher, make stone counter tops and other surfaces look like they were done by a real professiona. New Hardin industrial-grade variable speed wet polisher/grinder: This is our new Hardin variable speed wet grinder. This is a professional-grade machine that has a 950-Watt 8.29-Amp variable speed motor. It also has a variable speed dial for better control. You can run from 2,000 to 4,000 RPM. At 2500-RPM, the best polishing results can be achieved. To use, you just need to put the Hardin VSP polishing kit in your hands. A standard 5/8-inch garden hose can be used as a source of water for the 5-Feet 1/4-inch water line. This is how the profile wheel works. It’s kind of like how a router bit works. It has a flat surface that rides on top of the material that is being worked with. This is how it works: The bottom of the wheel has a guide bearing that rides on the side of the material. This makes sure that the piece is 100% true. Apply some force that’s parallel to the working surface, and you’re on your way to making a unique edge for your project. For this job, this Hardin VSP polishing kit with granite and marble pads is the best thing to have. Start with the 50-Grit pad and keep going until you get the shine that comes from the factory. Not all of the pads in this kit are meant to do all kinds of things with polishing. Those are professional-grade granite and marble pads that have a soft bond resin that lets the diamonds come out at a good rate for hard materials. Last in the set is the 10,000-Grit buff pad. Under the polisher, there is a water line that is 5 feet long and 1/4 inch wide. The end comes with a brass 5/8-inch coupling that you can put on a garden water hose. Spindle thread 5/8-11 UNC is the same on most attachments on the market. People who work with the GFCI are safe. This machine also comes with a vacuum brazed profile wheel, a bail handle, a side handle, a spindle wrench, extra carbon brushes, and more.
I made 40 square feet of concrete counter tops for our kitchen. I used this kit to make them shine to a very high shine. A good guess is that I spent between 12 and 15 hours with this. I’m going to show you some pictures so you can see what I did, then.
Pros.
– Despite what other people say, the D handle was easy to put together and worked well. Remove the hex bolts, put the D handle on, and put the hex bolts back in. I don’t know if I got a new version.
– I thought the round over part was great. How well did this work out for me? I had some doubts about how well this would work out, but it worked out really well. It took me until I was at 200 grit to polish the front edge of the counter, after I rounded it. The 50 and 100 grits were too rough for sanding around the edges. I set it to the lowest speed possible for the round over bit, since there were no instructions with the kit. There were no speed recommendations.
– I used the GFCI and it worked well for m. When I didn’t pay enough attention to where my cord was plugged in, I didn’t notice. In the end, the GFCI went off because it was getting wet, s. I used my bare hands to polish, and I didn’t get any shocks like other people said. I dried everything off, moved my plug, reset the GFCI, and I was back to polishing again.
I really like how the velcro pads worked out. Use no tools to switch between pads.
– I like the on/off switch. A sliding or rocking type is used to keep you from accidentally turning it on. It turns off with a light push.
Cons.
This kit comes with a 50 grit pad. I didn’t have to expose any aggregate on my counters, but I think it would be very hard for you to do that if you used it. I think I would use a more aggressive wheel for this. At Menards, I bought a diamond cup wheel to use on another project, and it does a great job of getting the aggregate out quickly.
No one told me how to use the included pads or round over bit to polish, so I didn’t know how to use them (ie. what speed to used for what grit). Different speeds didn’t make any difference. Even when I was going at the fastest speed, it didn’t look like I was burning the ground. That’s a given. My polisher was set to speed 4 for the most part of the project, and it did a good job.
The nut that holds the little handle to turn off the water kept coming loose. This wasn’t a big deal because I just tightened it back down by hand until I had a chance to tighten it with a pliers. Since I tightened it with the pliers, it hasn’t come loose again, and I don’t know why.
– When I keep polishing for a long time, I notice that the speed controller starts to change the speed on its own. Others have also said this. I think it’s because moisture starts to get into the switch that changes the speed. Whenever that would happen, I would turn off the water and let it run for a while (no polishing) so that it could get some dry air through the back of the machine. This always seemed to work.
Other ideas.
People don’t expect this thing to be waterproof. Because of that, I was very careful not to drip water onto the on/off switch, or anywhere near the back part of the polisher where the variable speed switch was.
Outside in 30 degree weather, I used hot water from our laundry tap to clean my concrete. This is how it worked. If you want to keep your concrete warm, you can do this. This didn’t seem to have any negative or positive effects (other than making my concrete warm).
– I like the on/off switch. In this case, it’s the sliding/rocking type that stops you from accidentally turning it on.
As other people have said, the brass water fittings do look a little cheap. Based on what other people said, I was careful not to stress the connections between things.